Installation Instructions for the GenX 5P and GenX 6P Tracking Devices with the 3 wire harness

Tools required:

  • Wire crimper
  • Digital multi-meter tool
  • Screwdriver
  • Trim removal tool
  • Ring connector for ground wire
  • Self-tapping sheet metal screw (#8 1/2″ preferred)
  • Electrical tape & zip ties
  •  

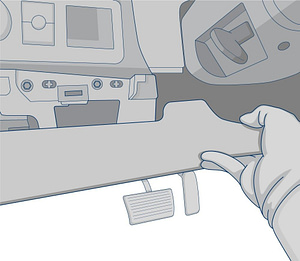
    Use a screwdriver or trim removal tool to remove the panel from the lower portion of your driver’s side dashboard

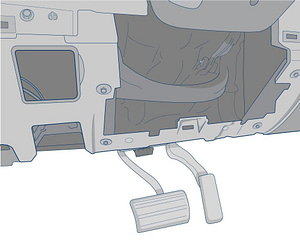
    Locate the vehicle’s constant & ignition power wires in the steering column, at the fuse block, or Body Control Module.

    Setup your digital multi-meter and set to 20v in the DCV section.

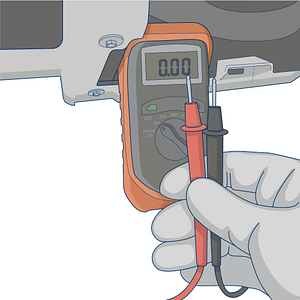
    Connect the black ground wire from the multi-meter to a metal portion of the framing under the dashboard.

    Locate the wire that you suspect would be the constant power wire. Probe the wire with the red multi-meter lead. Turn the vehicle’s ignition ON and OFF while the red meter lead is connected.  If the meter shows 12volts when the ignition is BOTH ON and OFF, then it is the constant wire.

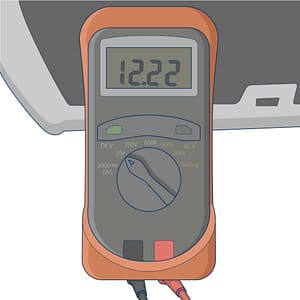
    Locate the wire that you suspect to have switched (ignition) power. Probe the wire with the red multi-meter lead. Turn the vehicle’s ignition ON (without fully cranking to a start).  The multi-meter should display greater than 12 volts while in this ignition position.

    With the red multi-meter lead still probing the ignition wire, turn the vehicle’s ignition ON to a full crank to start the engine. The wire’s voltage should not drop by more than 2 volts.

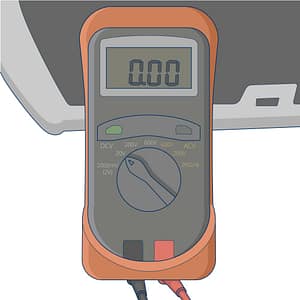
    Turn the vehicle’s ignition OFF and the multi-meter should show 0 volts.

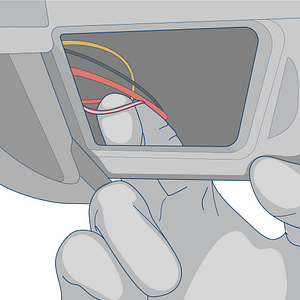
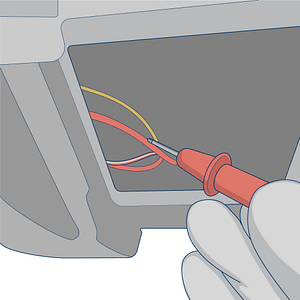
    Strip back the vehicle’s constant and switch power wires

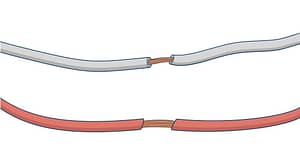
    Spread the wires apart to create a small opening

    Insert the exposed end of the white wire from the tracking device into the opening of the vehicle’s switched wire.  Insert the exposed end of the red wire from the tracking device into the vehicle’s constant wire.

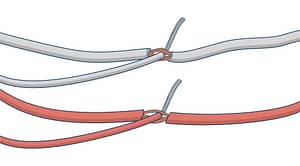
    Twist the tracking device’s wires around the vehicle’s wires.

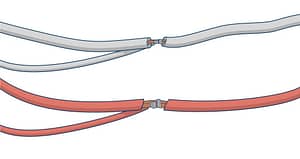
    Wrap electrical tape around the exposed wires.

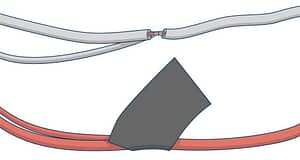
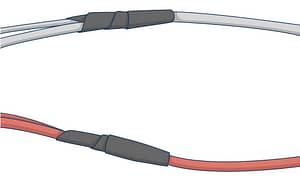
    Secure the electrical tape with zip ties.

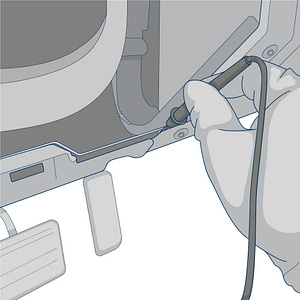
    Connect a ring connector to the end of the ground wire

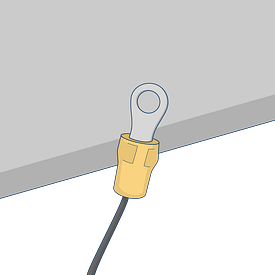
    Use a self-tapping sheet metal screw to connect the ring connector to the vehicle’s chassis.

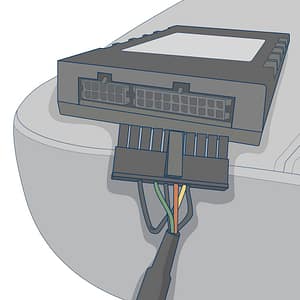
    Plug the rectangular plug into the device.

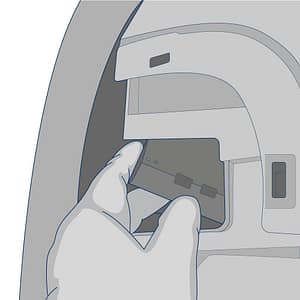
    With the QR code sticker facing down, route the device under the dashboard toward a location in the upper portion of the dashboard (if possible)

    Find a secure location below the dashboard to mount the device. Use zip ties to secure it to a wiring bundle or to the vehicle’s frame to ensure that it does not slip out while the vehicle is in operation.


    Required Information

    Record the serial number for the device and the VIN/Year/Make/Model of the vehicle on your worksheet for activation.


    Testing & Troubleshooting the GenX Devices

    In order to test the device, the vehicle must be parked outside in an open area so that it can receive a GPS lock. use the LED code descriptions below to confirm proper operation or troubleshoot a malfunctioning device.

    If you do not observe LED’s, please check the vehicle’s power source to the device for a bad fuse. If you are hard-wiring the device, verify that the ground connection is good. If you are plugging the device into the vehicle’s OBD-II port, check the owner’s manual to determine which fuse provides power to the port and verify that it isn’t bad.

    An experienced technician can run a volt meter to the OBD-II port to verify that it is receiving 12 volts of power.  Find a ground source for the negative test connection and tap the positive end of the test connection to port 16 of the OBDII port.

    OBDII port power pin 

    Green LED’s

    The unit will power up as the vehicle’s ignition is turned on. The Green LED will show solid for approximately 30 seconds (there may be some brief flickers initially while the device initializes). However, after initial startup, the LED should flash in the following sequence.

    Ignition on: Rapidly blinks 25 times on and off every 10 seconds. Ignition off: Slow blinks 8 times on and off every 8 seconds. After several hours of being parked, it will blink once every 3 seconds.

    A properly functioning device should have a flashing green LED and no red LED’s after it is fully booted.


    Troubleshooting

    Red LED’s

    If there is an error with the device, the red LED’s will blink in patterns of 2. The first blink tells you the area in which the device is having problems (i.e. hardware, modem, GPS, etc). The second blink provides specific error details. It will rotate through the codes if there are multiple error codes.

    1 X Codes

    1-1 blink pattern

    Issue: Can’t connect to server

    Resolution: Reach out to support@fieldlogix.com

    1-2 blink pattern

    Issue: Low supply voltage

    Resolution: Check wiring connection and vehicle’s battery voltage to ensure that it is greater than 8 volts.

    2 X Codes

    2-1 blink pattern

    Issue: Modem failing

    Resolution: Reach out to support@fieldlogix.com to RMA unit

    2-2 blink pattern

    Issue: Cannot detect SIM card

    Resolution: Check to ensure that SIM card is properly seated in socket. If loose, use a small piece of plastic, electrical tape or a heat glue gun to secure.

    2-3 blink pattern

    Issue: No cellular signal

    Resolution: Move vehicle to a location with stronger cellular coverage. If not resolved, e-mail support@fieldlogix.com

    2-4 blink pattern

    Issue: Cannot find network

    Resolution: Check to ensure that SIM card is properly seated in socket. If loose, use a small piece of plastic, electrical tape or a heat glue gun to secure. Drive vehicle to location with a stronger cellular signal.

    2-5 blink pattern

    Issue: Last data session failed

    Resolution: May be due to a temporary wireless network outage. Drive vehicle to location with a stronger cellular signal or wait for a period of time. If not resolved within 2 hours, contact support@fieldlogix.com

    2-6 blink pattern

    Issue: Cannot find network

    Resolution: May be due to a wireless network outage. Drive vehicle to location with a stronger cellular signal and wait for a period of time. If not resolved within 2 hours, contact support@fieldlogix.com

    3 X Codes

    3-1 blink pattern

    Issue: GPS module malfunction

    Resolution: Device must be sent back for repair. Please email support@fieldlogix.com to request an RMA.

    3-2 blink pattern

    Issue: GPS antenna malfunction

    Resolution: Device must be sent back for repair. Please email support@fieldlogix.com to request an RMA.

    3-3 blink pattern

    Issue: GPS not receiving any satellite signals

    Resolution: Please check device to ensure that it hasn’t fallen behind the dashboard and is obstructed by metal. Ensure that the proper side is facing upward. Ensure that vehicle is outdoors where it should have proper line of sight with the GPS satellites.

    3-4 blink pattern

    Issue: Receiving weak satellite signals

    Resolution: Please check device to ensure that it hasn’t fallen behind the dashboard and is obstructed by metal. Ensure that the proper side is facing upward. Ensure that vehicle is outdoors where it should have proper line of sight with the GPS satellites.

    3-5 blink pattern

    Issue: GPS signal doesn’t have a time value

    Resolution: The device’s internal clock isn’t functioning properly because it did not recieve a time value from the satellites. Reboot the device by disconnecting and reconnecting the power cable. If not resolved, email support@fieldlogix.com to request an over the air reboot of the device or an RMA if necessary.

    Contact support at 888-803-0200 Option 2 or support@fieldlogix.com if you encounter any issues with the installation or the troubleshooting steps do not resolve your issue

    FieldLogix